Using Juno with Fireworks MX : Vortex Creator
In this tutorial, you’ll learn how to effectively use the new Vortex Creator, part of the Juno command set from Phireworx. With Juno you have easy access to creating amazing effects that will bring any composition to life.
Before launching straight into the tutorial, if you haven’t yet purchased Juno, now is an excellent opportunity to do so.
Setting up the Workspace
| 1 | Create a new Fireworks document. Some of the commands produce quite large results, so set the canvas size to 800 x 800 pixels | |
| 2 | Create a new object, vector or bitmap on the canvas. For example a 20 x 20 pixels circle filled with a color of your choice is always a good starting point. Making sure that Fireworks MX is running at full screen, we are ready to start experimenting with Juno 1.0. |
Manufacturing a Vortex with Vortex Creator : Interface Overview
| 1 | From the Commands menu, select Phireworx > Vortex Creator 1.0. You should be presented with the interface shown below.Have a play with the interactive interface (below) and get a feel for what its doing within the preview area. |
Lets run through the interface quickly to get a feel of what it all does, and how you can control Vortex Creator, or alternatively, just have a play with the interactive interface above.
| 1 | These are the main dials; Steps, Radius and Birth Rate, and these controls are the primary controls for manipulation of the command within Fireworks MX.Steps: Controls the number of objects that are placed on the canvas and within the preview window
Radius: The controls the starting radius of the vortex. You will get differing effects depending upon the size of the object you initially selected from your canvas. The larger the object on your canvas, the greater the radius you will have to start with here. Birth Rate: Altering the birth rate alters the spread of the objects, as can be seen by experimenting within the interface. The higher the birth rate, the higher the spread of the objects within both the preview and your canvas. |
|
| 2 | Depending on whether you want quick effects, or whether you want to have finer control over the effect, entering the value within the input boxes will alter both the feedback slider on the dials, and also the preview window. | |
| 3 | These controls are the secondary controls for Vortex Creator and control the following aspect of vortex production;Opacity: Sets the opacity for all the objects both within the preview and the final effect to a single specified value. This can be used in conjuntion with Fade Opacity (See 4 below) for a more interesting fading effect.
Jitter: Altering the Jitter value, alters the placing of the objects both within the preview and the final effect slightly. |
|
| 4 | The Fade Opacity button will alter the opacity of the objects within the preview and the final effect by fading from the intital object to the final object. This option can be used in conjunction with the opacity dial to get some really interesting subtle effects. | |
| 5 | The Preview Window gives you a visual feedback on what the command is going to do on the canvas with your objects. This preview window worked well when we first included it in Twist and Fade 3.1 that shipped with Fireworks MX, so we kept the basics and gave it an overhaul | |
| 6 | Clicking on the apply button will create your effect on the canvas, and also save your settings for when you come back next time |
OK, now we’ve gone over the basics of the interface, its time to get down to the nitty gritty of vortex creation.
| 1 |  Select your object from the canvas, select Commands > Phireworx > Vortex Creator. In this example, i’ve used a snazzy little orb as my starting point for the vortex. Select your object from the canvas, select Commands > Phireworx > Vortex Creator. In this example, i’ve used a snazzy little orb as my starting point for the vortex. |
|
| 2 | Select the following settings:Steps: 37
Radius: 52 Birth Rate: 1.0306 Press Apply |
|
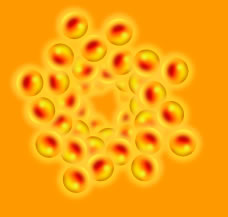
As you can see, with just a couple of simple settings, you can create an interesting vortex pattern. Lets alter some of the settings and see what else we can do.
| 1 | Select your object from the canvas, select Commands > Phireworx > Vortex Creator. In this example, i’m using the same orb, so we can see what playing with the settings does. |
|
| 2 | Select the following settings:Steps: 50
Radius: 54 Birth Rate: 1.0195 Opacity: 74 Press Apply |
|
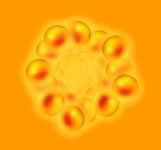
What we’ve done here, is to decrease the birth rate (spread), increased the steps slightly and decreased the opacity of the vortex for a more clustered look. Lets alter some more of the settings and see what we can create this time
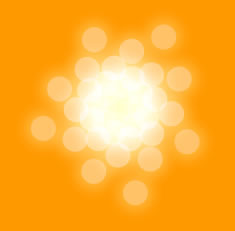
| 1 | Select your object from the canvas, select Commands > Phireworx > Vortex Creator.Here i’ve taken a simple circle with a subtle glow applied as the starting point. | |
| 2 | Select the following settings:Steps: 40
Radius: 25 Birth Rate: 1.0472 Fade Opacity: ON Press Apply |
|
Conclusion
Vortex Creator is extremely versatile… it doesn’t take the dog for a walk, or cook your lunch, but does what it sets out to do, create vortices, and by goodness, it does it well. Try playing with your settings, increasing the birth rate on smaller objects, decresing the radius, maximising the radius. I hope you have as much fun as we did creating the command.