Building Functioning Flash Buttons With Fireworks Graphics
Thanks in large part to Live Effects, Fireworks makes beautiful buttons. Given its ability to export to SWF, a lot of people assume that they can create killer buttons in Fireworks for use in Flash. Unfortunately, the integration of the two programs doesn’t extend quite that far. But that doesn’t mean you can’t create buttons in Fireworks for use in Flash. It just means that you need to do a couple extra steps.
In this tutorial, you will create button assets in Fireworks, and export them for use in Flash. In addition, you will learn how to add a simple ActionScript to the button that will enable you to use it as a part of a Flash navigation bar.
Building the Button in Fireworks
In this task, you will build and export the button to be used in Flash.
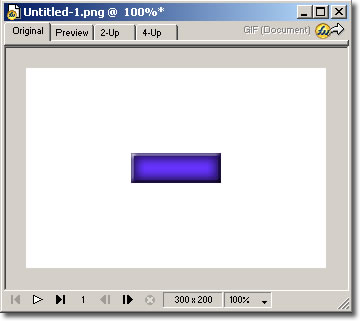
| 1 | Create a new Fireworks file with plenty of room to hold a button (you’ll trim it down later). | |
| 2 | Draw a rectangle to serve as your button. Mine is 90 pixels wide, 30 pixels high. I filled it with an indigo color—#6633FF. | |
| 3 | With the rounded rectangle still selected, click the Add Effects button, and give it Inner Glow and Inner Bevel Flat effects (Shown Below). Tinker with the effect settings until you are satisfied. |
Create a nice-looking button, taking advantage of Fireworks Live Effects.
| 4 | Choose Modify, Canvas, Trim Canvas, to crop the canvas to the same size as the button. | |
| 5 | Select the graphic and choose Edit, Copy. | |
| 6 | In the Frames panel (Window, Frames), click the New Frame button to add a second frame. | |
| 7 | In the second frame, choose Edit, Paste. This pastes a copy of the first button in the same canvas location. | |
| 8 | Change the fill color of the button, while leaving the other settings alone. Since this frame’s button will contain the Over state, I lightened it up a bit, using #6699FF (shown below). |
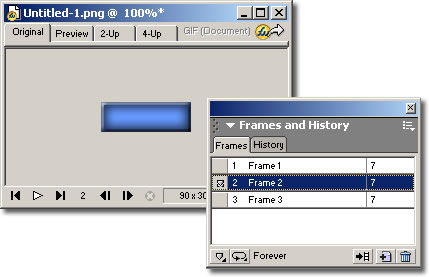
Copy the original graphic onto a new frame and change its fill color; this will be the button’s Over state in Flash.
| 9 | Repeat steps 5-8 to create a third button state. The color I went with, a bit darker since this version is for the button’s Down state, is #660066. | |
| 10 | Choose File, Export to open the Export dialog. |
| 11 | Choose Macromedia Flash SWF in the Save As Type drop-down menu. | |
| 12 | Still in the Export dialog, click Options to open the Macromedia Flash SWF Export Options dialog. | |
| 13 | In the Objects category (shown below), choose Maintain Appearance, leave the rest of the settings alone, and click OK. This setting rasterizes the graphic, since Flash can’t handle Live Effects, but at least the buttons will look the same, and since they are small, it won’t bloat the SWF too much. |
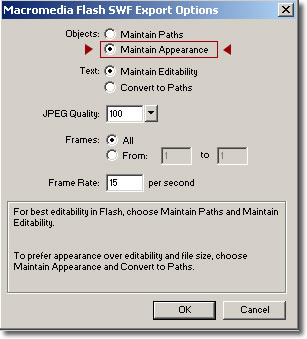
Choose Maintain Appearance so that the Live Effects transfer to Flash.
| 14 | Give the file a descriptive name, such as button.swf, and click Save to Export. |
Importing the Graphic Assets into a Flash Button
In this step, you will import the graphics into a Flash button symbol.
| 1 | In Flash MX, with a new file open, choose Insert, New Symbol. | |
| 2 | In the Create New Symbol dialog, name the button mybutton and set its behavior to Button (shown below) and click OK. |
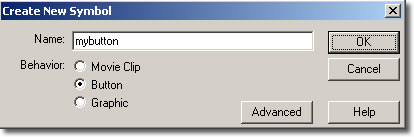
Create a new button symbol.
| 3 | In Button Symbol Editing Mode, choose File, Import. Navigate to the SWF file you exported a moment ago, and click Open. The three button states you created are automatically dumped into the Up, Over, and Down states of the button (Shown Below). In this example, you don’t have to worry about the Hit state. If you like, you can add a new layer to the Timeline and give the button a text label. |
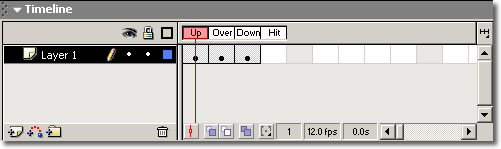
The three button states are dumped automatically into Flash’s Timeline.
| 4 | Choose Edit, Edit Document to return to the main Stage. | |
| 5 | Open the Library by pressing F11, and drag an instance of mybutton from the Library onto the Stage. |
Programming the Button
In this final step, you’ll program the ActionScript for the button to make it
| 1 | Select the button, and open the Actions panel (Window, Actions). Make sure the Actions panel’s title bar says Actions Button (and not Actions Frame). | |
| 2 | In the left pane of the Actions window, click Actions, then click Browser/Network, and finally double-click getURL (Shown Below) to add it to the script. |
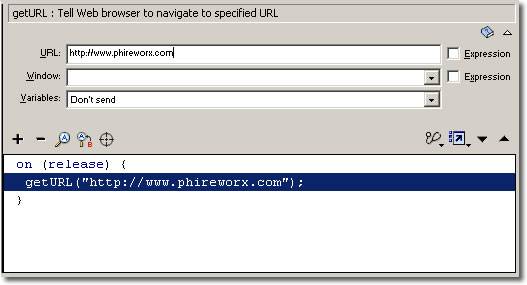
Double-click to add the getURL action to the script.(Actions > Browser/Network > getURL action)
| 3 | Select the getURL(“”); line in the script in the lower right pane, and enter a URL above in the URL field (Shown Above). You can leave the other fields empty. | |
| 4 | Choose Control, Test Movie to view the movie as an exported SWF. Roll over the button and then click it—you will see the different button states, and clicking will open the Web page you entered in the Actions panel. |