The Ones That Got Away: Image Loader and Random Link Apps in Flash
Load images using Flash components. Create a Random Link of the Day display for your site. Steve’s step-by-step tutorials explain all you need to know to complete both projects quickly and easily — and extend them to meet your own requirements!
Of the examples and solutions I developed for inclusion in the The Flash Anthology: Cool Effects & Practical ActionScript, there were several that didn’t make it into the book. I’ll be presenting a number of these solutions over the coming months, starting with this tutorial.
Here, we’ll look at two very practical solutions: the loading of images using components, and creating a random “Link of the Day” display for your site.
Before we get started, make sure you download the archive of all the code we’ll see in these examples.
Image Loading with Components
This solution requires: Flash MX 2004
I thought it would be a great idea to create a dynamic image loader that utilized some of the built-in components in Flash MX 2004, but I wanted to make sure the information was displayed in a structured way.
Here’s the application in action.

In this application, the Photo drop-down menu is populated according to the selection in the Category drop-down. When the user selects a photo, the image is displayed on the right-hand side.
Setting the Scene
The source files for this example are Dynamicimageloader.fla and dynamicimageloader_graphics.zip which are available from the code archive.
- Create a new 500 x 320 pixel Flash document. Accept the default frame rate and click OK.
- Rename the default layer Actions and add two further layers below, named Components and Background.
- Select the first frame of the Components layer. Drag two instances of the ComboBox component from the UI Components section of the Components Panel onto the stage, positioning the second below the first. Name the instances parentCombo and childCombo.
We will populate the childCombo instance dynamically in just a moment, using values from several arrays. - With the parentCombo instance selected, add the information from the table shown below into the Parameters section of the Component Inspector:
The labels for the Category ComboBox will appear as Phireworx, Work, and Home. We’ll use the “data” parameters to trigger the population of the childCombo ComboBox component.
- Drag three label components from the UI Components section of the Components Panel. Position one above the
parentComboComboBox, one above thechildComboComboBox, and one to the right of the first label. Select each label component and change the text parameter within the Property Inspector to Category, Photo and Image respectively. - Drag a Loader component from the UI Components section of the Components Panel into the first frame of the Components layer and name the instance
imageLoader.
We’ll use the Loader component as a repository for the images we’ll load dynamically in a moment. - Make the application more attractive: add a rounded framing rectangle with a smooth linear gradient background to the Background layer. Lock the Background layer.
We’re all done here; let’s add the ActionScript that glues the application together!
Adding the ActionScript
The ActionScript for this example hinges around three multidimensional arrays that hold “child” information for the “parent” categories. Through careful modification, and event listeners attached to the ComboBox components, we can trigger a cascade of events that result in the display of the relevant image.
- Select the first frame of the Actions layer and add the following code within the Actions Panel:
var PhireworxInfo = new Array(["Phireworx Logo", "pw001.jpg"], ["Foto Logo", "pw002.jpg"], ["Juno Logo", "pw003.jpg"]);
 var WorkInfo = new Array(["Work Logo", "wk001.jpg"], ["Work Image 001", "wk002.jpg"], ["Work Image 002", "wk003.jpg"]);
 var HomeInfo = new Array(["Home Image", "hm001.jpg"], ["Home Image 001", "hm002.jpg"], ["Home Image 002", "hm003.jpg"]);
 function populateChild() {
  childCombo.removeAll();
  var childArray = eval(parentCombo.getSelectedItem().data);
  for (var i = 0; i < childArray.length; i  ) {
    childCombo.addItem(childArray[i][0]);
  }
 }
 function showImage(img) {
  loadMovie(img, "imageLoader");
 }
 // Parent Combo Listener
 var parentComboListener = new Object();
 parentComboListener.change = function() {
  populateChild();
 };
 parentCombo.addEventListener("change", parentComboListener);
 // Child Combo Listener
 var childComboListener = new Object();
 childComboListener.change = function() {
  var childArray = eval(parentCombo.getSelectedItem().data);
  showImage(childArray[childCombo.selectedIndex][1]);
 };
 childCombo.addEventListener("change", childComboListener);
 // First run when loaded, populate combo's
 populateChild();
 var childArray = eval(parentCombo.getSelectedItem().data);
 showImage(childArray[childCombo.selectedIndex][1]);
Let’s get the code scalpel again and see how this looks on the ActionScript operating table. First of all, we create three multidimensional arrays.
var PhireworxInfo = new Array(["Phireworx Logo", "pw001.jpg"], ["Foto Logo", "pw002.jpg"], ["Juno Logo", "pw003.jpg"]);
 var WorkInfo = new Array(["Work Logo", "wk001.jpg"], ["Work Image 001", "wk002.jpg"], ["Work Image 002", "wk003.jpg"]);
 var HomeInfo = new Array(["Home Image", "hm001.jpg"], ["Home Image 001", "hm002.jpg"], ["Home Image 002", "hm003.jpg"]);
These arrays contain the description of the image and its filename, like so:
["Phireworx Logo", "pw001.jpg"]Notice that the array names (PhireworxInfo, WorkInfo, etc.) are the same as the “data” values within the parentCombo ComboBox component. As you will see in a moment, we use the “data” property from the parentCombo ComboBox to trigger the population of the childCombo ComboBox.
We then add an event listener to the parentCombo ComboBox, which waits for its value to change.
/ Parent Combo Listener
 var parentComboListener = new Object();
 parentComboListener.change = function()
 {
  populateChild ();
 };
 parentCombo.addEventListener("change", parentComboListener);
When the value is registered as changing, we trigger the populateChild() function.
function populateChild()
 {
  childCombo.removeAll();
  var childArray = eval(parentCombo.getSelectedItem().data);
  for (var i = 0; i < childArray.length; i  )
  {
    childCombo.addItem(childArray[i][0]);
  }
 }
First of all, this function removes all items from the childCombo ComboBox, to make it nice and tidy.
childCombo.removeAll();We then transfer the contents of the data parameter of the parentCombo ComboBox to a variable called childArray, which basically takes the array we defined at lines 1-3 of the code, and matches it to the data parameter of the parentCombo ComboBox. We use this to populate the childArray variable.
We then use a for loop based on the length of the array to add items to the childCombo ComboBox. The items added form the first part of the multidimensional array (the description).
childCombo.addItem(childArray[i][0]);With the childCombo ComboBox populated, we can move on to the section of code that deals with what happens when the value changes.
Again we set up an event listener, this time for the childCombo instance for the change event.
// Child Combo Listener
 childComboListener = new Object();
 childComboListener.change = function()
 {
  var childArray = eval(parentCombo.getSelectedItem().data);
  showImage(childArray[childCombo.selectedIndex][1]);
 };
 childCombo.addEventListener("change", childComboListener);
This time, however, a different function is triggered — the showImage() function. We pass it the second part of the multidimensional array (the image name) as a parameter.
Note: As both the selectedIndex property of the ComboBox and the “data” parameter of the childCombo instance are array-based, we can use the selectedIndex value of the childCombo ComboBox to select the image name for the currently assigned array.
showImage(childArray[childCombo.selectedIndex][1]);
The showImage() function is the simplest part of the ActionScript. It simply triggers the loadMovie() function to load the image in question into the imageLoader Loader component:
function showImage(img)
 {
  loadMovie (img, "imageLoader");
 }
When the movie is run first with no selection, we simply trigger child population and image retrieval using the following ActionScript:
// First run when loaded, populate combo's
 populateChild();
 var childArray = eval(parentCombo.getSelectedItem().data);
showImage(childArray[childCombo.selectedIndex][1]);- Save the document to a location of your choice and export your SWF, making sure the ‘ActionScript 2.0’ option is selected in the ‘ActionScript version’ dropdown.
- Extract the contents of the dynamicimageloader_graphics.zip file from the code archive into the same directory as your exported SWF.
We need to extract the image to the same directory as the SWF file, because this is referenced within the showImage() function as being located in the same directory - Preview your exported SWF file.
That’s a great technique! It’s scalable too — simply modify the array information, the parentCombo ComboBox (if you require more categories) and the actual images that are imported. The technique makes use of the built-in components within Flash MX 2004 and creates a clever interaction between ComboBox instances.
You could easily add a ProgressBar component to give you feedback on how much of the file is loaded if you’re working with larger files, and use XML data to populate both the parent and child combo boxes, but I’ll leave it up to you to extend the effect!
Random Link of the Day
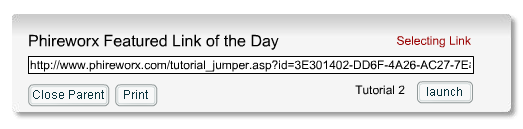
What I set out to do in this example was to create a random featured link of the day for which the link was selected randomly from a multidimensional array within a loop, then launched within a new chromeless browser window using simple JavaScript behaviors. The effect works really well and leverages some built-in JavaScript functions such as closing the parent window in which the SWF file is embedded, and triggering printing of the page.
There is much scope for extending this effect, but that’s what learning Flash is all about: experimenting with effects and extending them for your own needs.
To edit this effect, locate RandomLinkOfTheDay.fla within the code archive.
Setting the Scene
- Create a new Flash document that’s 510 pixels wide and 105 pixels high. Change the default frame rate to 24 fps and click OK.
- Rename the default layer Actions, and add below it two further layers called Interface and Background.
- Create a background rectangle to frame the application within the first frame of the Background layer as shown in Error! Reference source not found.. Lock the Background layer.
- Select the first frame of the Interface layer and create a new movie clip called linkMC. Name the instance linkMC. Embed a dynamic text box that’s approximately 445 pixels wide and 18 high within the linkMC movie clip. Name the instance randomlink.
- Select the randomLink text box and click Character in the Property Inspector. Click the Specify Ranges checkbox and select Uppercase, Lowercase, Numerals and Punctuation. Add / and under the Include these characters section. Click OK. Click the Show border around text option from the Property Inspector
This dynamic text box will be referenced and populated later by a series of URLs from part of the array that we’ll create shortly via ActionScript. - Move the linkMC movie clip approximately to center-stage, leaving enough room to add more content above and below the movie clip.
- Create a new dynamic text box that’s approximately 160 pixels wide above, and aligned with, the upper right edge of the linkMC movie clip. Name the instance reccount. Select Character from the Property Inspector, click the Specify Ranges checkbox, and select Uppercase, Lowercase, Numerals and Punctuation. Click OK. On the color swatch in the Property Inspector, change the text color to #990000.
This dynamic text box will constantly be updated when the ActionScript loops are running in a moment, and will provide feedback as to whether a link is in the process of being selected, or is selected. - Create another dynamic text box that’s approximately 160 pixels wide. Align it with the bottom right edge of the linkMC Movie Clip naming the instance title. Select Character from the Property Inspector, Specify Ranges checkbox and select Uppercase, Lowercase, Numerals and Punctuation. Click OK.
This dynamic text box will hold another part of the array that we will select randomly, and will hold the title for the URL within the ‘randomlink’ dynamic text box. - Create a new static text box above the linkMC Movie Clip. Align it with the upper left edge of the clip, and add the text Featured Link of the Day.
- Drag three instances of the button component from the UI Components of the Actions Panel into the first frame of the Interface layer. Arrange two instances so that they are grouped together at the bottom left edge of the linkMC Movie Clip; align the other with the lower right edge. Name the instance left to right
closeParent,printPage,windowLauncher. - With each of the button instances selected, within the Property Inspector change the label parameters left to right as follows: Close Parent, Print, launch.
We will use these buttons to execute certain JavaScript functions later in the example. - Save your work.
We’ve added all the dynamic text boxes and buttons that we need to set the scene for the effect, now we need to add the ActionScript to the movie to make it all gel together.
Adding the ActionScript
The ActionScript for this example explores the control of external JavaScript functions and the clever use of multidimensional arrays within Flash. Without further ado, let’s start to add the ActionScript!
- Select the first frame of the Actions layer and add the following code within the Actions Panel:
//Randomizer Function for Array
 function randomBetween(min, max) {
  return (min Math.floor(Math.random()*(max-min 1)));
 }
 //Create New Pseudo MultiDimensional Array
 RandomLinkArray = new Array(
 ["Front Page", "http://www.phireworx.com/"],
 ["Register for Free Commands", "http://www.phireworx.com/content/commands/registration.asp"],
 ["Phireworx Tutorials", "http://www.phireworx.com/content/tutorials/default.asp"],
 ["Crew Bios", "http://www.phireworx.com/content/crew/crew_bios.asp"],
 ["Quick Tips", "http://www.phireworx.com/content/quicktips/default.asp"],
 ["Tutorial 1", "http://www.phireworx.com/tutorial_jumper.asp?id=D2615715-D19B-49A8-91C2-52A0DA859E57"],
 ["Tutorial 2", "http://www.phireworx.com/tutorial_jumper.asp?id=3E301402-DD6F-4A26-AC27-7E8C8FDCED9C"],
 ["Tutorial 3", "http://www.phireworx.com/tutorial_jumper.asp?id=41163698-FD96-4DF4-A3E4-8217CBB80B22"]);
 //Set Initial LoopCount
 _root.linkMC.loopCount = 0;
 _root.linkMC.onEnterFrame = function() {
  if (this.loopCount<=50) {
    //Change Header Text Whilst Incrementing Throught the Loop
    _root.reccount.text = "Selecting Link";
    //Create Random Array Position
    var placer = randomBetween(0, RandomLinkArray.length-1);
    //Set the Random Link Text
    this.randomlink.text = RandomLinkArray[placer][1];
    //Set Random Link Title
    _root.title.text = RandomLinkArray[placer][0];
  } else {
    //Control for Text Feedback Area
    _root.reccount.text = "Link Selected";
  }
  this.loopCount  ;
 };
 //Miscellaneous Button Functions
 windowLauncher.onPress = function() {
  //Open New Browser Window with random array position
  getURL("javascript:openNewWindow('" _root.linkMC.randomlink.text "','','scrollbars=yes,resizable=yes,width=600,height=600')");
 };
 closeParent.onPress = function() {
  getURL("javascript:window.close()");
 };
 printPage.onPress = function() {
  getURL("javascript:window.print()");
 };
Let’s examine what we’re doing here, as the script may seem a little complicated at first glance.
First of all, we create a new global variable to hold the value of a loop count and add our often-used randomBetween function. As we’ll see in a moment, this loopcount global variable is used to make sure a condition loops only a given number of times.
//Set Initial LoopCount
 loopCount = 0;
 //Randomizer Function for Array
 function randomBetween(min, max) {
  return (min Math.floor(Math.random()*(max-min 1)));
 }
Next up, we create an array called RandomLinkArray.
//Create New Pseudo MultiDimensional Array
 RandomLinkArray = new Array(
 ["Front Page", "http://www.phireworx.com/"],
 ["Register for Free Commands", "http://www.phireworx.com/content/commands/registration.asp"],
 ["Phireworx Tutorials", "http://www.phireworx.com/content/tutorials/default.asp"],
 ["Crew Bios", "http://www.phireworx.com/content/crew/crew_bios.asp"],
 ["Quick Tips", "http://www.phireworx.com/content/quicktips/default.asp"],
 ["Tutorial 1", "http://www.phireworx.com/tutorial_jumper.asp?id=D2615715-D19B-49A8-91C2-52A0DA859E57"],
 ["Tutorial 2", "http://www.phireworx.com/tutorial_jumper.asp?id=3E301402-DD6F-4A26-AC27-7E8C8FDCED9C"],
 ["Tutorial 3", "http://www.phireworx.com/tutorial_jumper.asp?id=41163698-FD96-4DF4-A3E4-8217CBB80B22"]);
 };
To create the multidimensional array, we place an array within another array. We use this structure to hold both the title of a URL and the actual URL in the following format:
new Array (["Title", "URL"], ["Title", "URL"]);In this way, we can get both the title and the URL when referencing a random array element. In this example, we’re using pages from phireworx.com and, as the RandomLinkArray array is created as soon as the SWF is loaded, we are ready to reference the array within the onEnterFrame event handler of the linkMC Movie Clip.
_root.linkMC.onEnterFrame = function() {
  if (loopCount<=50) {
    //Change Header Text Whilst Incrementing Throught the Loop
    _root.reccount.text = "Selecting Link";
    //Create Random Array Position
    var placer = randomBetween(0, RandomLinkArray.length-1);
    //Set the Random Link Text
    this.randomlink.text = RandomLinkArray[placer][1];
    //Set Random Link Title
    _root.title.text = RandomLinkArray[placer][0];
  } else {
    //Control for Text Feedback Area
    _root.reccount.text = "Link Selected";
  }
  loopCount  ;
};loopCount variable is less than 50; if it is, we enter into the code within the condition. The loopCount variable is incremented at the end of the loop, and while the loopCount value is less than 50, the reccount dynamic text box displays the text Selecting Link, progressing to Link Selected when the loopCount variable hits 50.The next section of code within the event handler function for the linkMC movie clip is responsible for selecting a random array position by using the randomBetween() function to populate a variable (placer) with a number between 0 (first position within the array) and the final array position (we use the array length to determine this).
Note: we subtract one length of the random number generated as the randomBetween() function adds one to the number generated
var placer = randomBetween(0, RandomLinkArray.length-1);Remember how we created the RandomLinkArray? The following code pulls out the URL for the array member and populates the randomlink dynamic text box.
this.randomlink.text = RandomLinkArray[placer][1];The following code pulls out the title and populates the title dynamic text box:
_root.title.text = RandomLinkArray[placer][0];This code sits within the onEnterFrame event handler for the linkMC movie clip. Thus, this random pulling of array members and writing to the randomLink dynamic text box and title text box occurs at the frame rate of the movie (24 fps). Added to this is the fact we only loop 50 times while the value of the loopCounter global variable is less than 50. As such, we have about 2 seconds until the linkMC movie clip comes to rest finally on a random value.
It’s all very well to have some nifty code that creates a random link and title… But what do we do with it?
Well, because we’ll want to open a new browser window when we click the windowLauncher button, we add the following code to the onPress event for the windowLauncher button.
windowLauncher.onPress = function() {
  //Open New Browser Window with random array position
  getURL("javascript:openNewWindow('" _root.linkMC.randomlink.text "','','scrollbars=yes,resizable=yes,width=600,height=600')");
 };
When the windowLauncher button is pressed, we’ll call an external JavaScript function called openNewWindow();. This is a simple function that opens windows. With it, we’ll pass the random URL with which we’ve populated the randomLink dynamic text box.
The openNewWindow() function that we’re calling externally is contained within the code of the page into which the SWF file is embedded, so we pass the URL and some optional feature values for the size of the window, scrollbars and resize handles.
It’s pretty nifty to be able to call native JavaScript functions supported by common browsers, as well as any custom JavaScript functions we may wish to include in the Web page that houses the SWF. To this end, we must add the following code to allow the browser window to be closed, and to allow the user to print by the pressing the relevant buttons.
closeParent.onPress = function() {
  getURL("javascript:window.close()");
 };
 printPage.onPress = function() {
  getURL("javascript:window.print()");
};- Save and preview your work.
It’s a pleasant cyclic effect that creates the random URL and displays the category of the URL. However, although clicking on the Launch button does launch a new browser window with a load of JavaScript in the address bar, it doesn’t produce the right effect.
In order to take advantage of external JavaScript functions, we must export and embed the SWF file within an HTML page that contains our custom function.
- Export your Flash Movie as RandomLinkOfTheDay.swf to a location of your choice making sure that ActionScript version is set to ActionScript 2.0.
Embed in the Web Page
The source file for the Web page we’re about to create is called URLJumper.htm. It can be located within the code archive.
- With your HTML editor open, create a new .HTML page and type in the following code:
<html>
 <head>
 <title>Flash URL Jumper</title>
 <meta http-equiv="Content-Type" content="text/html; charset=iso-8859-1">
 <script language="JavaScript" type="text/JavaScript">
 <!--
 function openNewWindow(url,windowName,chrome) {
  window.open(url,windowName,chrome);
 }
 //-->
 </script>
 </head>
 <body>
 <object classid="clsid:D27CDB6E-AE6D-11cf-96B8-444553540000" codebase="http://download.macromedia.com/pub/shockwave/cabs/flash/swflash.cab#version=6,0,29,0" width="550" height="110">
  <param name="movie" value="RandomLinkOfTheDay.swf">
  <param name="quality" value="high">
  <embed src="RandomLinkOfTheDay.swf" quality="high" pluginspage="http://www.macromedia.com/go/getflashplayer" type="application/x-shockwave-flash" width="550" height="110"></embed>
 </object>
 </body>
 </html>
As you will note, we have embedded our SWF in a standard fashion within the Web page, but we’ve also added the openNewWindow() function declaration, which is sitting there waiting for us to call it!
- Save your page as URLJumper.htm in the same location as your previously exported RandomLinkOfTheDay.swf.
- Double click the URLJumper.htm file to preview the effect.
Now, when you preview the embedded SWF file, clicking the “Launch” button after it has selected a random URL will open a new Browser Window — but without most of the “chrome” at the size we specified in Flash!
Click on the ‘Close Parent’ window and the browser page in which the SWF file is embedded will happily close (after warning you!). A click on the ‘Print’ button will open the printing dialog boxes.
This is just a small cross-section of the JavaScript functions you can call. Of course, you can call any of your own custom JavaScript functions that are located within the same page as the SWF that’s being viewed.