Creating a Command With Zero Programming
In this tutorial, you will create a Fireworks command using the History panel. The History panel stores all of your actions in Fireworks as you work. You can then group a sequence of these actions, and save them as a command. The History panel, therefore, is great for recording sequences of actions that you use over and over. You just perform the sequence once, save it as a command, and then the next time you need to perform that sequence of actions, just run the command from the Commands menu and make Fireworks do all the work.
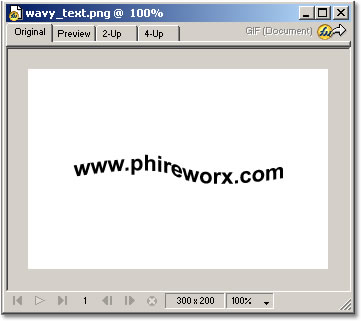
Imagine that your site requires several text strings to appear wavy, like the text shown below. Now, creating this effect requires several steps. You need a text block and a path to attach it to. You need to attach the text to a path. You need to center the text on the path. And you need to set the text orientation to Skew Horizontal.
That sounds easy enough. But if you just start typing text and drawing the path, and you resize the text to fit the path, and then you recolor the text, and then you scale the path up, you’ll end up with a very crowded History panel. Instead, you need to set the text size and color in advance. Likewise, the line you draw has to be the final line. In this way, you can minimize the steps needed in the History panel and simplify the script.
Let’s give it a try. Open Fireworks, and perform the steps below to practice. Our goal is to create a command as described above, which we’ll call Wavy Text.
| 1. | Select the Text tool. | |
| 2. | Before touching it to canvas, enter the following settings in the Property inspector: Arial, size 22, black color, bold, and center aligned. | |
| 3. | Click near the middle of the canvas and type the following text: www.phireworx.com. If you prefer, you can enter any string of roughly the same length. | |
| 4. | Click to select the Pen tool. On canvas, hold down the Shift key and click three times in a horizontal line that spans from the left to the right of the canvas; the second point should be right in the middle of the overall path. The path should be wider than the text block. The Shift key constrains your placement along the horizontal axis, ensuring that you draw a straight line. | |
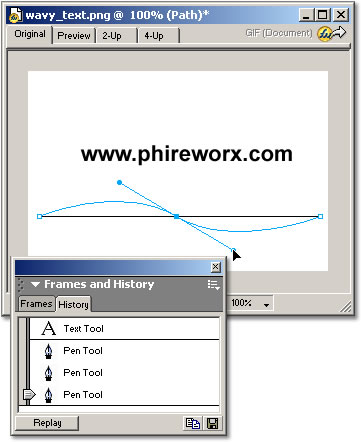
| 5. | With the Pen tool, click and drag on the middle point to add a wavy curve to the path (see below). When you are finished with this step, the History panel should list Text Tool and then Pen Tool four times. |
| 6. | Switch to the Pointer tool, hold down the Shift key, and select the text and the path. Choose Text, Attach to Path. The text is attached to the center of the path, because you chose center alignment. The last item in the History panel is Attach Text to Path. | |
| 7. | With the text/path group still selected, choose Text, Orientation, Skew Vertical.If you look in the History panel now, you should see seven total steps. You should also note that two separator lines appear, which means that you can’t just save the whole script as it is. That is a setback, because I was originally hoping I could save the whole thing as a command. A compromise is in order. | |
| NOTE: Sometimes a command made from steps that cross a separator line work just fine, in spite of it. Usually, you should try it anyway. Sadly, in this case, it doesn’t work. |
If you think about it, though, the first two segments occur before the Attach Text to Path step. If you already have a text block and a path on stage then the command could simply attach the text to the path and change its orientation.
While you’re at it, you can also make sure that the text is center aligned. It already is for this text block, because you set that back at the beginning. Unfortunately, that part was before a separator line. So, you can apply center alignment again, which makes no difference to the current text, since it is already center aligned; however, it will add that step to the History panel, which in turn enables you to add it to your final command.
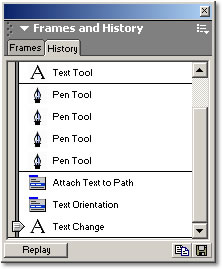
| 8. | Choose Text, Align, Centered Horizontally. The option is already checked, but click it again. It should be added to the History panel, which should at this point look like the one shown below | |
 |
||
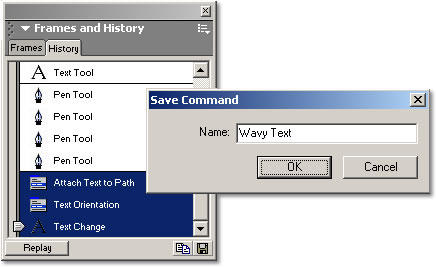
| 9. | Hold down the Shift key and select the last three steps. These are the steps that you will save as a command. | |
| 10. | Click the Save Steps as a Command button in the lower right corner of the dialog. | |
| 11. | In the Save Command dialog (shown below), enter Wavy Text as the name and press OK. |
| 12. | Deselect everything in the document, and choose Commands, Wavy Text. As you can see, nothing happened. That’s because the script is expecting a text and a path selection. Since nothing is selected, the command doesn’t work. | |
| 13. | Draw a new path, and type out a new text string. Hold down the Shift key and select them both. Choose Commands, Wavy Text. Presto! |
Conclusion
The separator line is perhaps the most significant problem when creating commands with the History panel. Again, the separator line appears any time you change your selection.
The reason for this requires some understanding of scripting, but here it is: Every time you try to perform an action (that is, call a method of the API), the DOM is checked to figure out which object is selected. Different objects have different methods; for example, the setTextAutoKern() method (which applies auto kerning to a text block) of the text object couldn’t be applied to a rectangle. Neither could the rectangle’s setRectRoundness() method (which specifies the roundedness of a rectangle’s corners) be applied to text.
But if you apply Auto Kerning to a text object, and then select a rectangle and change its roundness, the two commands could end up one after the other in the History panel. The separator line would be introduced to inform you that you couldn’t create a single command from that, because there is no object that both commands could be applied to.
In short, while problems occur if you change the active selection, History panel commands work beautifully with any sequence of steps that is applied to the same object(s).
Finally, if you want to remove the Wavy Text command you just created, choose Commands, Manage Saved Commands to open the custom command manager. Select the Wavy Text command and click the Delete button.